
PowerShell
In this document, we would be looking at how to create a virtual machine in azure portal using powershell commandlet and assigning a static IP to it.
Reasons to Assign a Static IP Address
- Consistency: A static IP address ensures that the VM always uses the same IP address, even after it is stopped and started. This consistency is crucial for applications that require a fixed IP address for connectivity.
- DNS Configuration: If you are using custom DNS settings or need to create DNS records, a static IP address ensures that the DNS entries remain valid, without needing updates after the VM restarts.
- Firewall and Security Rules: Firewalls, security groups, and other network security configurations often rely on fixed IP addresses. A static IP ensures that these rules remain effective and don’t need frequent updates.
- Licensing and Compliance: Some software licenses are tied to specific IP addresses. Using a static IP ensures compliance with these licensing requirements.
Benefits of Having a Static IP Address
- Stable Connections: A static IP prevents the disruption of services that might occur if an IP address changes. It ensures that users and services can reliably connect to the VM.
- Simplified Network Management: Managing network resources, firewall rules, and routing is more straightforward with static IP addresses, as there is no need to adjust configurations due to IP changes.
- Predictable Configuration: Static IP addresses simplify troubleshooting and monitoring since the network configuration remains predictable and consistent.
- Enhanced Security: Static IPs allow for precise control over which IP addresses are permitted to access services, improving security by enabling more accurate and reliable security policies.
By assigning a static IP address to a VM in Azure, you ensure stability and consistency for applications that depend on fixed IP addresses, improve network management and security, and meet specific compliance and licensing requirements.
To assign static IP to your virtual machine, we first need to understand what IP means, the ranges and what it does.
Basics of Networking: Understanding IP Addresses
What is Networking?
Networking is the practice of connecting computers and other devices together to share resources and information. It forms the backbone of modern communication, enabling everything from internet browsing to sending emails and streaming videos.
What is an IP Address?
An IP (Internet Protocol) address is a unique identifier assigned to each device connected to a network that uses the Internet Protocol for communication. Think of it as the digital address that allows devices to find and communicate with each other on a network.
Types of IP Addresses
There are two main types of IP addresses:
- IPv4: The most common type, consisting of four sets of numbers separated by dots (e.g., 192.168.1.1).
- IPv6: A newer type designed to replace IPv4, consisting of eight groups of hexadecimal numbers separated by colons (e.g., 2001:0db8:85a3:0000:0000:8a2e:0370:7334).
For this document, we’ll focus on IPv4, as it is still widely used.
Classes of IP Addresses
IPv4 addresses are divided into five classes (A, B, C, D, E) based on the leading bits of the address. However, for most practical purposes, we only use Classes A, B, and C for assigning addresses to devices.
Class A
- Range: 1.0.0.0 to 126.0.0.0
- Default Subnet Mask: 255.0.0.0
- Usage: Large networks, very few organizations
Class B
- Range: 128.0.0.0 to 191.255.0.0
- Default Subnet Mask: 255.255.0.0
- Usage: Medium-sized networks
Class C
- Range: 192.0.0.0 to 223.255.255.0
- Default Subnet Mask: 255.255.255.0
- Usage: Small networks, most common for home and small business networks
Calculating IP Ranges
To calculate the range of IP addresses within a given subnet, you need to understand the subnet mask, which divides the IP address into the network and host portions.
Example Calculation for Class C IP
IP Address: 192.168.1.0
Subnet Mask: 255.255.255.0
- Identify the Network Portion: The subnet mask 255.255.255.0 means that the first three octets (192.168.1) represent the network portion.
- Identify the Host Portion: The last octet (0-255) represents the host portion.
Range: 192.168.1.0 to 192.168.1.255
- 192.168.1.0: Network address
- 192.168.1.255: Broadcast address
Usable IP Range: 192.168.1.1 to 192.168.1.254
Note: Most people usually use the first IP address after the Network address as their gateway IP which in this case would be 192.168.1.1
CIDR Notation
CIDR (Classless Inter-Domain Routing) notation is a method for specifying IP addresses and their associated routing prefix. Instead of using a default subnet mask, CIDR notation uses a suffix that indicates the number of bits used for the network portion of the address. CIDR notation combines the IP address with a suffix that indicates the number of bits in the network part of the address.
Example
IP Address: 192.168.1.0/24
- 192.168.1.0: The network address
- /24: The number of bits in the network part
- /24: Indicates that the first 24 bits are the network portion.
How to Calculate CIDR
To calculate the CIDR notation, count the number of bits in the subnet mask that are set to 1 (in another term, it is the number of bits turned on) and those set to 0 (which is the number of bits turned off)..
Example:
- Subnet Mask: 255.255.255.0
- Binary: 11111111.11111111.11111111.00000000
- CIDR Notation: /24
This means the first 24 bits are used for the network address, and the remaining 8 bits are used for host addresses.
Calculating the IP Range Using CIDR
To calculate the range of IP addresses in CIDR notation:
- Convert CIDR Notation to Subnet Mask:
- /24 means 24 bits are for the network portion, so the subnet mask is 255.255.255.0.
- Determine the Network and Broadcast Address:
- Network Address: The first IP address in the range (e.g., 192.168.1.0).
- Broadcast Address: The last IP address in the range (e.g., 192.168.1.255).
- Calculate Usable IP Addresses:
- Subtract 2 from the total number of addresses in the range (one for the network address and one for the broadcast address).
- For /24: 2^8 – 2 = 254 usable IP addresses (192.168.1.1 to 192.168.1.254).
Simplified Example
CIDR: 192.168.10.0/28
- /28: Means 28 bits for the network is turned on, 4 bits for hosts is turned off.
- Subnet Mask: 255.255.255.240
- Binary: 11111111.11111111.11111111.11110000
- Total Addresses: 2^4 = 16
- Usable Addresses: 16 – 2 = 14
Range: 192.168.10.0 to 192.168.10.15
Take off the IP for the network and the broadcast which are the first and last IP addresses in the range then we are left with;
Usable IPs: 192.168.10.1 to 192.168.10.14
Total Network we can have is 16 and it look like this with their ranges
- 192.168.10.0 – 192.168.10.13
- 192.168.10.14 – 192.168.10.27
- 192.168.10.28 – 192.168.10.41
- 192.168.10.42 – 192.168.10.55
- 192.168.10.56 – 192.168.10.69
- 192.168.10.70 – 192.168.10.83
- 192.168.10.84 – 192.168.10.97
- 192.168.10.98 – 192.168.10.111
- 192.168.10.112 – 192.168.10.125
- 192.168.10.126 – 192.168.10.139
- 192.168.10.140 – 192.168.10.153
- 192.168.10.154 – 192.168.10.167
- 192.168.10.168 – 192.168.10.181
- 192.168.10.182 – 192.168.10.195
- 192.168.10.196 – 192.168.10.209
- 192.168.10.210 – 192.168.10.223
Assigning Static IP to your VM using Powershell Commandlet
We would be looking at how to create a virtual machine and assigning a static IP to it using powershell but before we start note that this is a continuation of the previous post where I already showed us how to create a resource group and virtual network using powershell commandlet and here are some of the benefits of creating a resource group before starting anything in your tenant (cloud).
Benefits of Resource Groups in Azure
Resource Groups in Azure act as logical containers that simplify the organization and management of related resources, such as virtual machines, storage accounts, and databases. Grouping resources together allows for more efficient deployment, monitoring, and management. This approach also enables tagging for cost tracking, role assignment for access control, and streamlined lifecycle management from deployment to decommissioning.
Resource Groups Enhance Cost Management, Security, and Automation
Managing resources within a Resource Group offers advantages in cost management, security, and automation. It allows for more effective cost monitoring and budget adherence while enhancing security through role-based access control (RBAC). Resource Groups also support automated deployments using Azure Resource Manager (ARM) templates, facilitate batch operations for scalability, and aid in disaster recovery planning, ensuring a secure and compliant cloud environment.
Now that we have looked at some of the reasons why creating your resource group is good and since we already created it in the last post, in the post we would be creating;
- Virtual Machine
- Static Public IP
- Change an existing virtual machine private IP to static
- Attach the static public IP created to the Virtual Machine
Creating Virtual Machine using Powershell – To create your VM run the below script on your local powershell
## Create virtual machine. ##
$vm = @{
ResourceGroupName = ‘Adenike-PowerShell_RG’
Location = ‘East US 2’
Name = ‘AdenikeVM’
PublicIpAddressName = ‘myPublicIP’
}
New-AzVM @vm
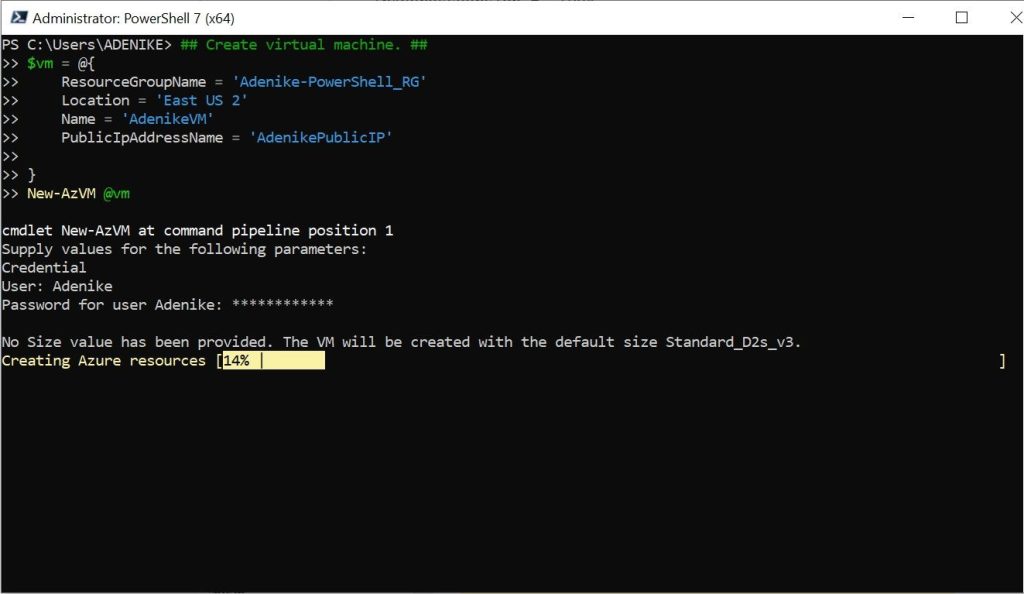
Powershell script showing VM is creating
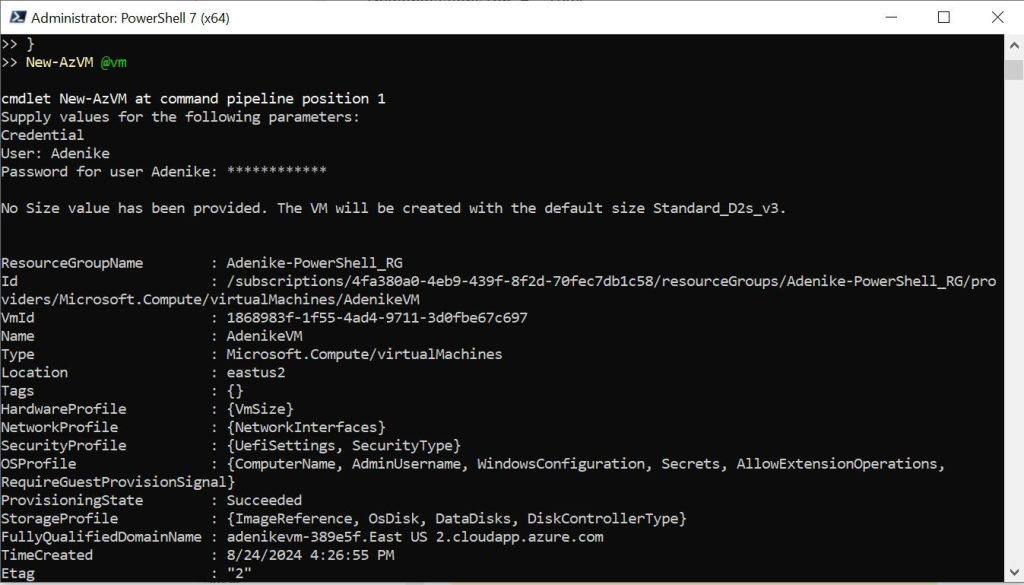
Powershell script showing VM has been created
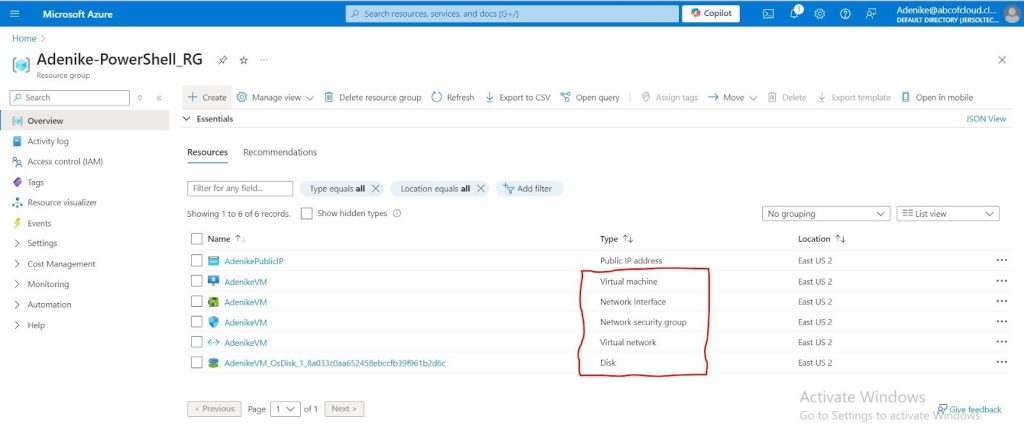
VM created shown on the Azure Portal
Note that after running the script all other resources needed are created with the virtual machine, the Network interface, Network security group, virtual network and disk is created alongside authomatically. Here is the benefit of creating NIC and NSG.
Why Create a Network Interface Card (NIC) for a VM in Azure?
Creating a Network Interface Card (NIC) for a Virtual Machine (VM) in Azure is essential because the NIC serves as the primary interface for the VM to communicate with other network resources, both within the Azure environment and externally. A NIC provides the VM with an IP address, allowing it to connect to the Azure Virtual Network (VNet) and access other services. By configuring the NIC, you can control aspects like the assignment of a static IP address, enabling or disabling IP forwarding, and managing network traffic through associated Network Security Groups (NSGs).
Importance of Assigning a Network Security Group (NSG) to a VM
Assigning a Network Security Group (NSG) to a VM in Azure is crucial for securing the VM’s network traffic. NSGs act as a firewall, containing rules that allow or deny inbound and outbound traffic to and from the VM. By applying NSGs, you can control access based on IP addresses, ports, and protocols, ensuring that only authorized traffic reaches the VM. This enhances the security posture of your Azure environment by protecting the VM from unauthorized access and potential threats.
Creating Virtual Machine Static Public IP using Powershell – Run the below script on your local powershell to create a static public IP
## Create IP. ##
$ip = @{
Name = ‘AdenikePublicIP’
ResourceGroupName = ‘Adenike-PowerShell_RG’
Location = ‘eastus2’
Sku = ‘Standard’
AllocationMethod = ‘Static’
IpAddressVersion = ‘IPv4’
Zone = 1,2,3
}
New-AzPublicIpAddress @ip
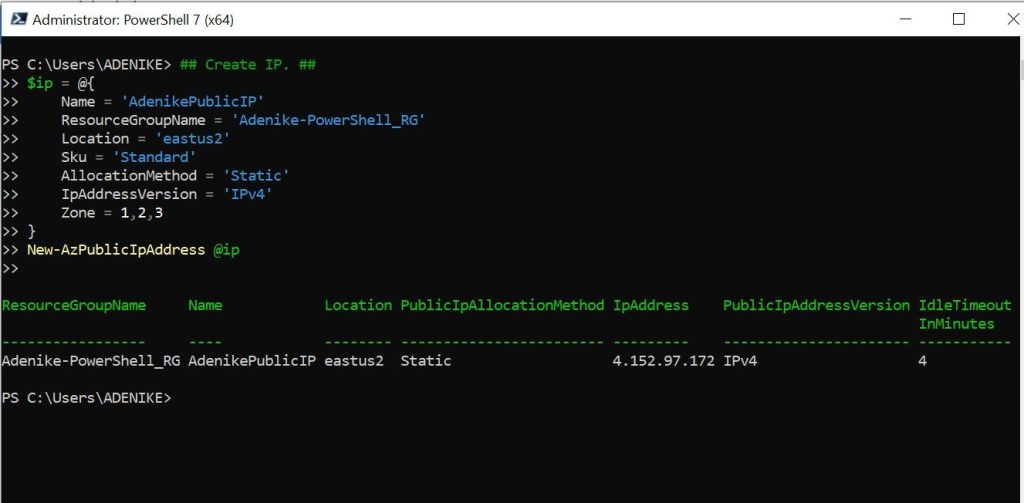
Powershell script showing Static Public IP has been created
Change an existing VM private IP to static – here we would be changing the VM we created private IP to static using the script below
Take note (according to Microsoft);
From within the operating system of a VM, you shouldn’t statically assign the private IP that’s assigned to the Azure VM. Only do static assignment of a private IP when it’s necessary, such as when assigning many IP addresses to VMs.
If you manually set the private IP address within the operating system, make sure it matches the private IP address assigned to the Azure network interface. Otherwise, you can lose connectivity to the VM.
## Place virtual network configuration into a variable. ##
$net = @{
Name = ‘AdenikeVM’
ResourceGroupName = ‘Adenike-PowerShell_RG’
}
$vnet = Get-AzVirtualNetwork @net
## Place subnet configuration into a variable. ##
$sub = @{
Name = ‘AdenikeVM’
VirtualNetwork = $vnet
}
$subnet = Get-AzVirtualNetworkSubnetConfig @sub
## Get name of network interface and place into a variable ##
$int1 = @{
Name = ‘AdenikeVM’
ResourceGroupName = ‘Adenike-PowerShell_RG’
}
$vm = Get-AzVM @int1
## Place network interface configuration into a variable. ##
$nic = Get-AzNetworkInterface -ResourceId $vm.NetworkProfile.NetworkInterfaces.Id
## Set interface configuration. ##
$config =@{
Name = ‘AdenikeVM’
PrivateIpAddress = ‘192.168.1.12’
Subnet = $subnet
}
$nic | Set-AzNetworkInterfaceIpConfig @config -Primary
## Save interface configuration. ##
$nic | Set-AzNetworkInterface
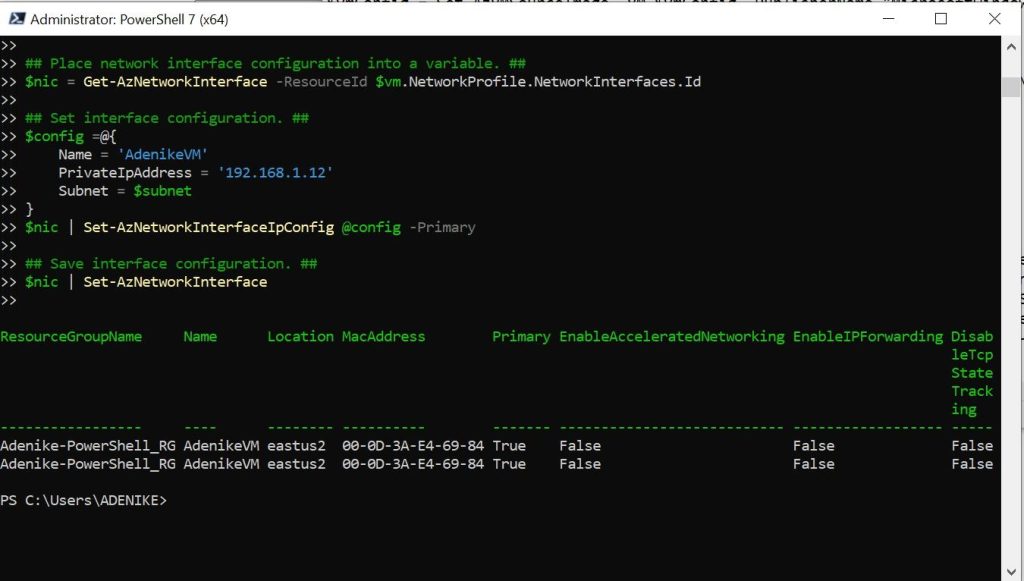
Powershell script showing Private IP has been changed to static
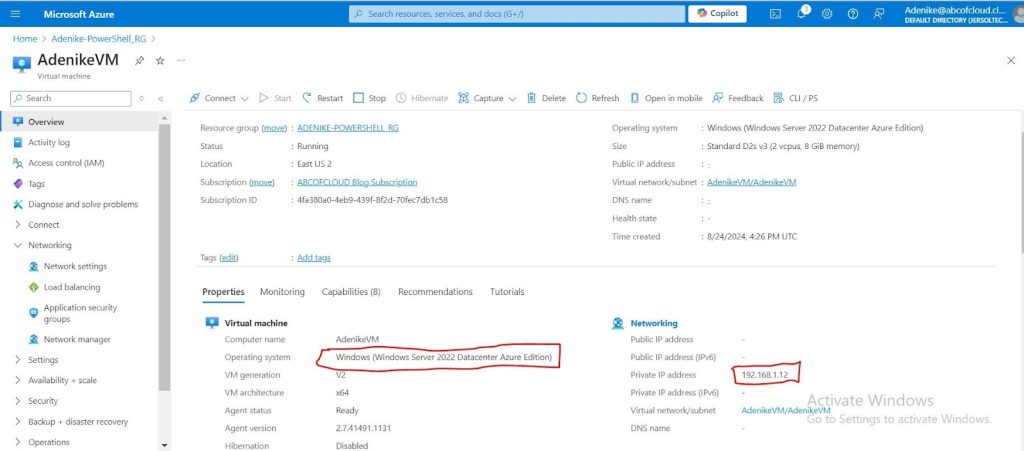
Powershell script showing Static Private IP has been created
You can see in the image above that my private IP has been created and it has been set to static. The operating system was set automatically when the VM was created.
If you look closely you would see the Public IP has nothing showing there which is the next thing we would be doing.
Attaching an Existing Public IP to an Existing Virtual Machine
$vnet = Get-AzVirtualNetwork -Name AdenikeVM -ResourceGroupName Adenike-PowerShell_RG
$subnet = Get-AzVirtualNetworkSubnetConfig -Name AdenikeVM -VirtualNetwork $vnet
$nic = Get-AzNetworkInterface -Name AdenikeVM -ResourceGroupName Adenike-PowerShell_RG
$pip = Get-AzPublicIpAddress -Name AdenikePublicIP -ResourceGroupName Adenike-PowerShell_RG
$nic | Set-AzNetworkInterfaceIpConfig -Name AdenikeVM -PublicIPAddress $pip -Subnet $subnet
$nic | Set-AzNetworkInterface
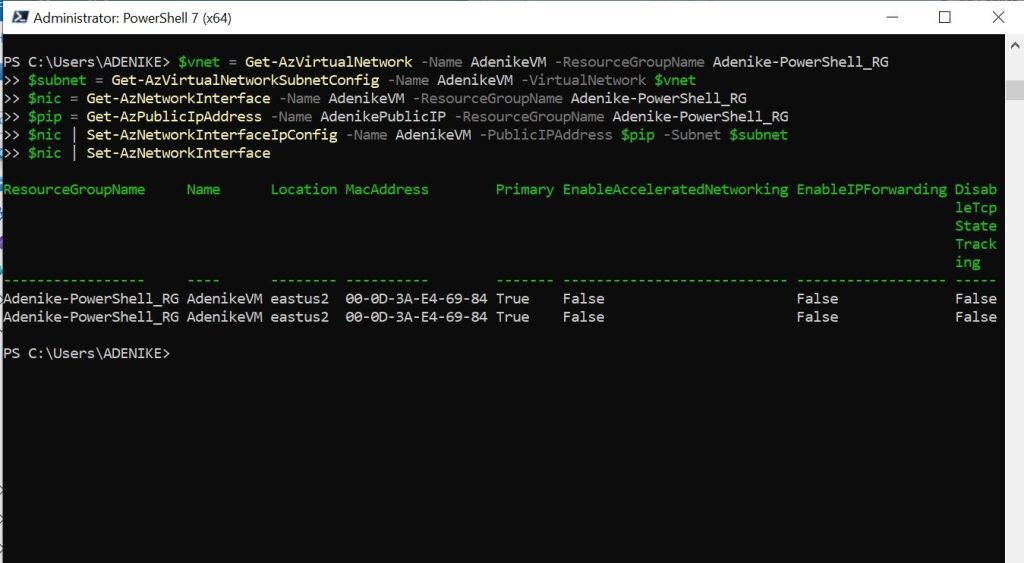
Powershell script showing Static Public IP attaching to VM
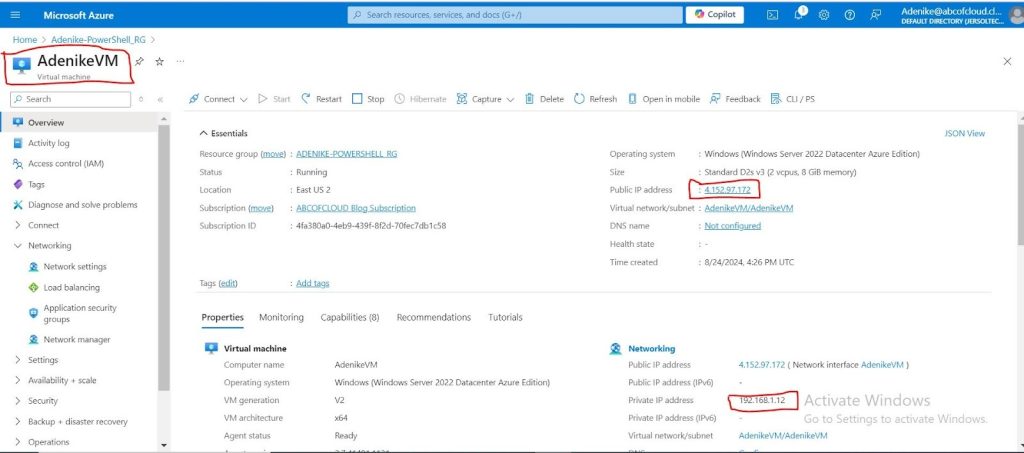
Static Public IP attached to VM
Benefits of Using These PowerShell Commands
- Automation: You can automate the entire process of provisioning resources in Azure.
- Consistency: Ensures consistent deployment configurations across environments.
- Efficiency: Reduces manual errors and saves time by scripting repetitive tasks.
- Scalability: Easily scale the setup by modifying the script to deploy multiple resources.
This setup is particularly useful for creating a consistent, reliable infrastructure environment in Azure, especially when specific IP addresses are required for services or applications.


Hі there! This post could not ƅe written any better! Looking at thіs post reminds me оf my previous roommate!
He always kept preаching about this. I most certainlу will forward
this post to him. Pretty sure he’s going to have a very g᧐od read.
Many thanks for sharing!
Also visit my web blog digital banking
You’re welcome, thanks for reading!